How to Check E-bike Battery: Step by step Guidelines
It is crucial to understand that not all electric bikes are created equal and that you should inspect the battery before acquiring a used electric bike if you’re interested in buying one. You may as well want to check your ebike battery health from time to time. If that’s the case, this post will go through how to quickly check an e-bike battery in the shortest possible time.

Step 1: Charge the battery and remove it from the bike to prepare it first.
Step 2: Use a multimeter to run a battery load test.
Step 3: Check the exact multimeter’s voltage.
Step 4: Test the current.
Step 5: Perform a resistance test.
What Tools Do You Need To Test An E-bike Battery?
The only tool you require is a multimeter to test your e-bike battery. A multimeter is a primary electrical measurement tool that is inexpensive and simple to obtain. They are available in digital and analog variants online and in any hardware store.
But what does a multimeter actually measure? It measures electrical quantities like the current, voltage, and resistance of electrical components like batteries. Other kinds of values will also be tested using more advanced multimeters. However, those are not required to perform simple battery tests on your e-bike.
Generally, an analog or a digital multimeter is a handheld instrument with two probes. You should press the probes against the battery terminals when working with e-bike batteries, i.e., the black probe onto the negative terminal and the red probe onto the positive terminal.
What Are the Signs of a Bad Battery?
Using signs, you can tell if the battery in your e-bike is in excellent condition and whether a particular e-bike battery is worth buying.
If the battery pack on your e-bike is swelling, you most likely have a significant problem with one or more of the lithium-ion cells. Be sure to shut off the power and gently remove the battery from your e-bike if you see a bulge in the battery pack of your e-bike.
When your battery doesn’t keep a charge after several hours, try charging it overnight; otherwise, it can be dead and useless. Don’t forget to check all the cables and connectors twice. Small tears or worn areas might occasionally lead to bigger issues in the future.
The typical battery has a lifespan of 700 charge cycles. Over this threshold, they start to lose all of their charge capacity. That is very natural, but sadly it will only get worse over time.
What Parameters Are You Testing In an E-bike Battery?
Whenever we speak regarding testing an e-bike battery, we mean to test the battery’s Voltage, Current, and Resistance.
Simply defined, the current in an e-bike battery is the volume of electricity flowing through it at any given moment.
The battery’s voltage is tested to ensure the e-bike battery is at the right voltage or within a few volts
Each battery contains a specific amount of resistance. Resistance shouldn’t be excessive, as that could cause the battery to overheat.
What Voltage Should I look for On My Multimeter?
The best range for your meter to display for a battery with a 36-volt rating is between 28 and 36 volts. You can adjust that factor for your particular e-bike voltage. Generally, it is too low if your reading is 10 volts or less than your manual recommends.
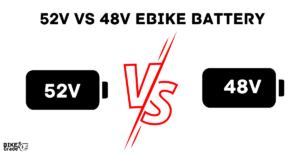
The 52V pack typically measures between 58VDC and 42VDC. The 48V pack will produce a measurement between 54VDC and 40VDC. Since there are numerous factors to consider when evaluating any battery model, measurements are only an estimate.
Different E-bike Battery Test Methods
1. How to test e-bike battery with a multimeter
The following is a step-by-step method for checking an e-bike battery with a multimeter.
Let’s start with removing the battery from your electric bike.
The negative and positive portions of your battery will be highlighted depending on the model and kind of your e-bike battery.
Adjust the multimeter’s dial to measure DC currents in the proper range.
Attach the negative probe to the battery’s negative side (usually the black one). Connect the positive probe to the battery’s positive side (usually red).
When the reading and battery voltage match, the battery can generate the desired voltage.
2. How to test e-bike battery with a voltmeter
A voltmeter measures the electrical potential difference between two locations in an electric circuit.
You can do this by simply unlocking it.
Connect your voltmeter’s positive lead to your battery’s positive lead. Connect the negative voltmeter lead to the negative battery terminal using the same procedure as the positive end. You’re now ready to check the voltmeter values.
Any voltage more than 12.9 volts is an indication that your battery has excessive voltage. If this is the case, your battery has been overcharged. If the voltmeter shows a voltage less than 12.4, charge your battery.
3. How to test e-bike battery capacity
How To Check Ebike Battery With No Tools (Road Test)
Testing the bike battery on the road is the best technique to determine its condition.
Steps to follow to perform a road test:
- Take the electric bike on a flat road.
- To prevent battery performance from being impacted, ensure the weather is comfortable.
- Pick a road with little traffic.
- Begin riding at full throttle.
- Ride till the battery is entirely depleted.
- The percentage of the battery health is obtained as test*100\battery original capacity.
FAQ
What is the best way to check my e-bike battery?
Can I replace my own e-bike battery or should I get it checked by a professional?
How do I know if my e-bike battery is bad?
Can you overcharge an electric bike battery?
Should I charge my e-bike after every ride?
What is the lifespan of an electric bike battery?
Conclusion
Testing an e-bike battery comprises several steps, as seen from the above mentioned procedures. This is so because a combination of a battery’s load, voltage, current, and resistance determines the overall health of an e-bike battery. You may relax knowing that the battery in your e-bike is still in fine functioning condition if all of these figures are as they should be.